Introduction
For a while now, the INAV Fixed Wing Group have shared an OpenTX model, designed to get people new to OpenTX flying as soon as possible. This model was great for beginners, and experienced pilots alike; as it provides the features that are used most often.
But, there are some people who wanted more. So this is why the Pro version of the model developed. This second evolution of the pro model has a few additional safety features, as well as support for ExpressLRS.
Are you new to INAV?
Do you understand advanced tuning techniques?
Do you know how the PIFF controller works?
The Pro version includes features designed for advanced INAV users. If you don’t know what you are doing, they can at best mess up the handling; at worst, bring down your plane! If you are new to INAV, you should 100% use the standard model. Also, if you don’t need or understand any of the pro features, please use our standard model instead.
Download the Pro Model Here
Click the link below to download the latest version of the INAV Fixed Wing Group OpenTX Pro Model pack
Transmitters and the INAV LUA
Due to the features on this model, you can only use the pro version on FrSKy Q-X7/Jumper T16 level transmitters and above. Without a doubt, there will not be a release for any of the lite series FrSky transmitters.
Additionally, you will need to install the INAV LUA to get the most from this OpenTX model. Not only is it a great backup if your video goes out. It also allows the model to be more flexible.
Supported Transmitters
- FrSky Horus X10, X10S, X10 Express, and X10S Express
- FrSky Horus X12S
- Jumper T16, T16 Plus, T16 Pro T16 Pro V2, and T18
- RadioMaster TX16S
- FrSky Taranis Q-X7, Q-X7S, Q-X7 ACCESS, and Q-X7S ACCESS
- FrSky Taranis X9D, X9D Plus, X9D Plus SE, X9D Plus 2019, and X9D Plus SE 2019
ExpressLRS
Support for ExpressLRS has been added to the model. You can use as-is with the WIDE_HYBRID mode. But, you will need to make a couple of changes to use it with HYBRID_SWITCHES_8 mode. You will also have less in-flight adjustments available. NORMAL mode is not supported.
Features
We have taken the concept of the standard model, and extended it for more advanced users. So, all of the features that are available in version 3 of the standard version are here too. We have removed the warnings system, designed to aid learning for new pilots; which grants us more flexibility. INAV handles the essential safety checks. Also, at the pro level, the pilot should have enough experience to decide and take responsibility for this.
From the standard model, we have:
- Flight timer, starts when you first raise the throttle
- Total flight timer, keeps track of all the time the plane has been in the air
- Model image and name readout
- Seven flight modes: Manual, Acro, Angle, Cruise, Position Hold, RTH, and Waypoint Missions
- Auto tuning
- Five OSD positions, off and 4 configurable OSDs
- Multi-function momentary switch.
In addition to this, we have in-flight tuning of 12 parameters, waypoint mission features, and an enhanced multi-function momentary switch.
Switch Layout

Arming
The arming switch now has its own channel. This makes reversal simple (documented below) and also allows you to change flight modes on the bench.
Flight modes
This model allows the use of 7 flight modes on switches SA, SB, and SD. You can change these flight modes in INAV to whatever you like. Because we are using the LUA script, the feedback will always be correct. However, as a word of warning, the priority order below is permanent. So we recommend that you don’t change RTH or Manual, so that they can override everything else in case of emergencies. By default the flight modes are:
- Return to Home
- Manual
- Position Hold
- Waypoint Mission
- 3D Cruise – Angle – Acro
Multi-function Momentary switch
You can use the momentary switch SH as a shortcut to perform functions. Firstly, hold the switch in and you will hear options. Then, release the switch on the option you want to use.
- Reset the flight timer
- Enter the INAV OSD menu*
- Save the current configuration *
- Load a waypoint mission*
* Requires you to be disarmed
OSDs
In the pro version, there are 5 different OSD positions, all accessible from the S1 pot. On the far left is off. Then, as you rotate right you have standard (in a failsafe situation, INAV will use this OSD), alt 1, alt 2, and alt 3.
In-flight parameter adjustments
Alt 3 is the in flight tuning OSD. In this position we use the throttle and yaw trims to change adjustments and values. Use the throttle trim to switch between the adjustment parameter. Then use the yaw trim to change the value. As soon as you leave that OSD, the trims revert back to normal and adjustments are turned off on INAV. This means no accidental adjustments.
Currently there are 12 adjustment parameters:
- Pitch: P & I
- Roll: P & I
- Yaw: P & I
- Cruise Throttle
- Pitch to Throttle ratio
- Board Pitch Alignment
- Level P
- Position XY: P & I
* FF is currently not available in the adjustments. However it will be available from INAV 2.6.
Auto tuning
Auto level and auto tune are both available on switch SC. These modes are disabled when the OSD is in the in-flight tuning position (OSD alt 3) and an adjustment is selected.
If you perform an auto tune in your flight. You will get a reminder to save when you disarm.
Customising or extending the model
Feel free to add extra features to this transmitter model. This model uses channels 1-8, plus 11 and 12. So channels 9, 10, and 13 onwards are free for you to use as you wish.
You can also change the flight modes to whatever suits you. Though, we highly recommend not changing RTH or Manual, due to a logic defined channel order. If you want to make more in-depth changes, this article may help.
Installation Videos
We have some installation videos for the Pro OpenTX model. There is a video in English from Darren Lines (Mr D – RC), and a video in German from Marc Hoffmann (B14ckyy’s Tech). Please check them out for an overview and instructions. Please remember to give the videos a like. Plus subscribing to them would be a kind gesture too.
Installing on the Transmitter
The installation process is the same as for the Standard OpenTX Model. So for more detailed steps, please have a look on that page. Here we will be covering the steps in brief, including specific filenames that you need.
Pre-requisites
You will need the latest release versions of OpenTX Companion and INAV Configurator on your computer. Also note, the minimum version of the INAV firmware for this model is 3.0.2. Though 4.1 is highly recommended.
INAV and the Flight Controller
You should have your flight controller set up as far as possible. If it is fully set up, that is not a problem at all. But it should at least be at the level of the calibrations and mixer complete. All peripherals such as the receiver (with telemetry), barometer, and GPS should be installed and working.
Transmitter
Make sure that LUA and Global Variables are active on your transmitter. In OpenTX companion, lua should have a check mark, and nogvars must be unchecked. LUAC is always on since OpenTX 2.3.0, so we do not need to worry about this.
You should install the latest release version of the INAV LUA on your transmitter. The installation manual for the INAV LUA can be found here.
Installing the Pro OpenTX Model on your transmitter
Download the latest version of the Pro OpenTX Model v2. You will always find this at the top of this page. Inside the archive you will find the models for different transmitters. You will also need to download the latest transmitter sound pack.
Copy the sound pack to your transmitter’s SD card. All our transmitter models use the same sound pack. You can also update it whenever a new version comes out.
Find the IFWG OpenTX Pro Model v2 zip file that you downloaded. Extract this file to the desktop. You will find an images folder. If you have a colour LCD screen transmitter, copy this folder to the transmitter’s SD Card.
Back up your transmitter with OpenTX companion.
Then, copy the correct IFWG Pro OpenTX Model to your transmitter. If you are unsure on this, check the documentation for the Standard Model.
Now bind to your receiver. Plug in the flight controller so that the GPS is active. Then go to the telemetry screen on the transmitter and discover all sensors. You can then follow the LUA guide on renaming some of the sensors. This last step is not required for Crossfire.
Finally, make sure that the endpoints for the Adj P output (Channel 12) start at 1000 in iNav’s receiver page. If not, adjust the min endpoint until it 1000 is reached. Then, use the value for the min end point, without the negative symbol; and set the max end point to that value.
The arm switch
When first installed, the arming switch has sound files associated with it. This allows you to know which way it should be working as far as the transmitter is concerned. If you would like to have the arm switch work the opposite way around. Just follow the instructions below.
Reversing the arm switch
To reverse the arm switch, on the transmitter, enter the model menu. Page through until you reach INPUTS. Find input 5, Arm. Then long press the enter button and choose Edit. Find the Weight and reverse it. For example 100 would become -100. Exit out of the edit screen back to inputs. Then long press the page button to go backwards through the menu, until you reach the setup page. Scroll down until you find the switch warnings. Reverse the position of the switch warning for switch SF. Exit, and you’re done.
Shutting up the arm switch
Once you have set your arm switch how you like it. You can remove the voice prompts. To do this, go to the Special Functions. SF1 and SF2 are the functions responsible for these sounds. You can just clear these functions and the sounds will stop. Just long press the enter button and choose the clear option.
Configuring INAV
Head into Configurator and go to the CLI page. Copying in the following code will set up the default flight modes, adjustments, and tuning OSD layout.
INAV 3.0.2 onwards (Analogue video)
# Features
feature FW_AUTOTRIM

# Modes
aux 0 0 0 900 1475
aux 1 1 1 1225 1325
aux 2 12 1 1675 1775
aux 3 53 1 1375 1475
aux 4 11 1 1550 1650
aux 5 10 1 1900 2100
aux 6 28 1 1450 1550
aux 7 21 3 1700 2100
aux 8 54 3 900 1300
aux 9 19 2 1625 1875
aux 10 42 2 1125 1375
aux 11 43 2 1375 1625
aux 12 44 2 1875 2100

# adjrange
adjrange 0 0 7 1025 1075 14 6
adjrange 1 0 7 1075 1125 15 6
adjrange 2 0 7 1125 1175 16 6
adjrange 3 0 7 1175 1225 17 6
adjrange 4 0 7 1225 1275 10 6
adjrange 5 0 7 1275 1325 11 6
adjrange 6 0 7 1325 1375 12 6
adjrange 7 0 7 1375 1425 13 6
adjrange 8 0 7 1425 1475 21 6
adjrange 9 0 7 1475 1525 23 6
adjrange 10 0 7 1525 1575 24 6
adjrange 11 0 7 1575 1625 5 6
adjrange 12 0 7 1625 1675 36 6
adjrange 13 0 7 1675 1725 35 6
adjrange 14 0 7 1725 1775 32 6
adjrange 15 0 7 1775 1825 33 6
adjrange 16 0 7 1825 1875 52 6
adjrange 17 0 7 1875 1925 54 6
adjrange 18 0 7 1925 1975 55 6
adjrange 19 0 7 1975 2025 56 6

# osd layout
set osd_failsafe_switch_layout = ON
osd_layout 3 0 25 1 V
osd_layout 3 1 1 8 H
osd_layout 3 2 0 0 H
osd_layout 3 3 8 6 H
osd_layout 3 4 8 6 H
osd_layout 3 5 23 8 H
osd_layout 3 6 23 9 H
osd_layout 3 7 24 2 V
osd_layout 3 8 20 2 H
osd_layout 3 9 23 4 H
osd_layout 3 10 1 12 H
osd_layout 3 11 15 11 V
osd_layout 3 12 1 4 H
osd_layout 3 13 2 8 H
osd_layout 3 14 26 0 H
osd_layout 3 15 23 3 V
osd_layout 3 16 2 1 V
osd_layout 3 17 2 2 V
osd_layout 3 18 2 3 V
osd_layout 3 19 6 1 H
osd_layout 3 20 18 12 H
osd_layout 3 21 0 12 H
osd_layout 3 22 12 0 H
osd_layout 3 23 15 0 H
osd_layout 3 24 12 2 H
osd_layout 3 25 28 4 H
osd_layout 3 26 20 5 V
osd_layout 3 27 14 5 V
osd_layout 3 28 21 12 H
osd_layout 3 29 23 12 H
osd_layout 3 30 1 10 V
osd_layout 3 31 24 3 H
osd_layout 3 32 2 11 V
osd_layout 3 33 8 11 V
osd_layout 3 34 18 2 H
osd_layout 3 35 21 11 V
osd_layout 3 36 1 5 H
osd_layout 3 37 1 6 H
osd_layout 3 38 1 7 H
osd_layout 3 39 1 5 H
osd_layout 3 40 15 12 H
osd_layout 3 41 24 8 V
osd_layout 3 42 24 9 V
osd_layout 3 43 0 0 H
osd_layout 3 44 0 0 H
osd_layout 3 45 0 0 H
osd_layout 3 46 3 6 H
osd_layout 3 47 3 7 H
osd_layout 3 48 23 7 H
osd_layout 3 49 23 6 H
osd_layout 3 50 0 0 H
osd_layout 3 51 12 2 H
osd_layout 3 52 12 2 H
osd_layout 3 53 12 1 H
osd_layout 3 54 12 1 H
osd_layout 3 55 1 8 H
osd_layout 3 56 2 6 V
osd_layout 3 57 8 10 H
osd_layout 3 58 7 11 H
osd_layout 3 59 2 12 H
osd_layout 3 60 2 12 H
osd_layout 3 61 16 6 H
osd_layout 3 62 16 6 H
osd_layout 3 63 21 6 V
osd_layout 3 64 2 12 H
osd_layout 3 65 2 12 H
osd_layout 3 66 2 12 H
osd_layout 3 67 2 4 V
osd_layout 3 68 11 4 V
osd_layout 3 69 20 4 V
osd_layout 3 70 2 12 H
osd_layout 3 71 2 12 H
osd_layout 3 72 2 12 H
osd_layout 3 73 2 12 H
osd_layout 3 74 2 12 H
osd_layout 3 75 2 7 V
osd_layout 3 76 11 7 V
osd_layout 3 77 21 7 V
osd_layout 3 78 0 0 H
osd_layout 3 79 2 12 H
osd_layout 3 80 2 12 H
osd_layout 3 81 2 12 H
osd_layout 3 82 2 12 H
osd_layout 3 83 2 12 H
osd_layout 3 84 2 12 H
osd_layout 3 85 24 5 V
osd_layout 3 86 19 2 H
osd_layout 3 87 19 3 H
osd_layout 3 88 19 4 H
osd_layout 3 89 19 5 H
osd_layout 3 90 19 6 H
osd_layout 3 91 19 7 H
osd_layout 3 92 19 8 H
osd_layout 3 93 19 9 H
osd_layout 3 94 19 10 H
osd_layout 3 95 19 11 H
osd_layout 3 96 0 0 H
osd_layout 3 97 0 12 H
osd_layout 3 98 0 0 H
osd_layout 3 99 0 0 H
osd_layout 3 100 12 4 H
osd_layout 3 101 12 5 H
osd_layout 3 102 12 6 H
osd_layout 3 103 12 7 H
osd_layout 3 104 0 0 H
osd_layout 3 105 3 5 H
osd_layout 3 106 1 2 H
osd_layout 3 107 1 3 H
osd_layout 3 108 7 4 H
osd_layout 3 109 7 7 H
osd_layout 3 110 22 11 H
osd_layout 3 111 23 9 H
osd_layout 3 112 24 10 H
osd_layout 3 113 1 1 H
osd_layout 3 114 1 2 H
osd_layout 3 115 1 3 H
osd_layout 3 116 1 4 H
osd_layout 3 117 2 8 V
osd_layout 3 118 11 9 V
osd_layout 3 119 9 0 V
osd_layout 3 120 0 0 H
osd_layout 3 121 3 4 H
osd_layout 3 122 3 5 H
osd_layout 3 123 3 6 H
osd_layout 3 124 23 2 H
osd_layout 3 125 0 0 H
osd_layout 3 126 0 0 H
osd_layout 3 127 0 0 H
osd_layout 3 128 22 1 V
osd_layout 3 129 0 10 H

save
INAV 4.1.0 onwards (HD Zero video)
# Features
feature FW_AUTOTRIM

# Modes
aux 0 0 0 900 1475
aux 1 1 1 1225 1325
aux 2 12 1 1675 1775
aux 3 53 1 1375 1475
aux 4 11 1 1550 1650
aux 5 10 1 1900 2100
aux 6 28 1 1450 1550
aux 7 21 3 1700 2100
aux 8 54 3 900 1300
aux 9 19 2 1625 1875
aux 10 42 2 1125 1375
aux 11 43 2 1375 1625
aux 12 44 2 1875 2100

# adjrange
adjrange 0 0 7 1025 1075 14 6
adjrange 1 0 7 1075 1125 15 6
adjrange 2 0 7 1125 1175 16 6
adjrange 3 0 7 1175 1225 17 6
adjrange 4 0 7 1225 1275 10 6
adjrange 5 0 7 1275 1325 11 6
adjrange 6 0 7 1325 1375 12 6
adjrange 7 0 7 1375 1425 13 6
adjrange 8 0 7 1425 1475 21 6
adjrange 9 0 7 1475 1525 23 6
adjrange 10 0 7 1525 1575 24 6
adjrange 11 0 7 1575 1625 5 6
adjrange 12 0 7 1625 1675 36 6
adjrange 13 0 7 1675 1725 35 6
adjrange 14 0 7 1725 1775 32 6
adjrange 15 0 7 1775 1825 33 6
adjrange 16 0 7 1825 1875 52 6
adjrange 17 0 7 1875 1925 54 6
adjrange 18 0 7 1925 1975 55 6
adjrange 19 0 7 1975 2025 56 6


# OSD Layout for HD Zero
set osd_failsafe_switch_layout = ON
set osd_video_system = HD
osd_layout 3 0 38 1 V
osd_layout 3 1 1 8 H
osd_layout 3 2 0 0 H
osd_layout 3 3 8 6 H
osd_layout 3 4 8 6 H
osd_layout 3 5 23 8 H
osd_layout 3 6 23 9 H
osd_layout 3 7 37 2 V
osd_layout 3 8 20 2 H
osd_layout 3 9 23 4 H
osd_layout 3 10 1 12 H
osd_layout 3 11 26 15 V
osd_layout 3 12 1 4 H
osd_layout 3 13 2 8 H
osd_layout 3 14 26 0 H
osd_layout 3 15 36 3 V
osd_layout 3 16 8 1 V
osd_layout 3 17 8 2 V
osd_layout 3 18 8 3 V
osd_layout 3 19 6 1 H
osd_layout 3 20 18 12 H
osd_layout 3 21 0 12 H
osd_layout 3 22 12 0 H
osd_layout 3 23 15 0 H
osd_layout 3 24 12 2 H
osd_layout 3 25 28 4 H
osd_layout 3 26 38 8 V
osd_layout 3 27 1 10 V
osd_layout 3 28 21 12 H
osd_layout 3 29 23 12 H
osd_layout 3 30 11 14 V
osd_layout 3 31 24 3 H
osd_layout 3 32 8 15 V
osd_layout 3 33 16 15 V
osd_layout 3 34 18 2 H
osd_layout 3 35 35 15 V
osd_layout 3 36 1 5 H
osd_layout 3 37 1 6 H
osd_layout 3 38 1 7 H
osd_layout 3 39 1 5 H
osd_layout 3 40 15 12 H
osd_layout 3 41 34 11 V
osd_layout 3 42 34 12 V
osd_layout 3 43 0 0 H
osd_layout 3 44 0 0 H
osd_layout 3 45 0 0 H
osd_layout 3 46 3 6 H
osd_layout 3 47 3 7 H
osd_layout 3 48 23 7 H
osd_layout 3 49 23 6 H
osd_layout 3 50 0 0 H
osd_layout 3 51 12 2 H
osd_layout 3 52 12 2 H
osd_layout 3 53 12 1 H
osd_layout 3 54 12 1 H
osd_layout 3 55 1 8 H
osd_layout 3 56 8 8 V
osd_layout 3 57 8 10 H
osd_layout 3 58 7 11 H
osd_layout 3 59 2 12 H
osd_layout 3 60 2 12 H
osd_layout 3 61 16 6 H
osd_layout 3 62 16 6 H
osd_layout 3 63 34 9 V
osd_layout 3 64 2 12 H
osd_layout 3 65 2 12 H
osd_layout 3 66 2 12 H
osd_layout 3 67 20 4 V
osd_layout 3 68 20 5 V
osd_layout 3 69 20 6 V
osd_layout 3 70 2 12 H
osd_layout 3 71 2 12 H
osd_layout 3 72 2 12 H
osd_layout 3 73 2 12 H
osd_layout 3 74 2 12 H
osd_layout 3 75 8 9 V
osd_layout 3 76 21 11 V
osd_layout 3 77 34 10 V
osd_layout 3 78 0 0 H
osd_layout 3 79 2 12 H
osd_layout 3 80 2 12 H
osd_layout 3 81 2 12 H
osd_layout 3 82 2 12 H
osd_layout 3 83 2 12 H
osd_layout 3 84 2 12 H
osd_layout 3 85 37 4 V
osd_layout 3 86 19 2 H
osd_layout 3 87 19 3 H
osd_layout 3 88 19 4 H
osd_layout 3 89 19 5 H
osd_layout 3 90 19 6 H
osd_layout 3 91 19 7 H
osd_layout 3 92 19 8 H
osd_layout 3 93 19 9 H
osd_layout 3 94 19 10 H
osd_layout 3 95 19 11 H
osd_layout 3 96 0 0 H
osd_layout 3 97 0 12 H
osd_layout 3 98 0 0 H
osd_layout 3 99 0 0 H
osd_layout 3 100 12 4 H
osd_layout 3 101 12 5 H
osd_layout 3 102 12 6 H
osd_layout 3 103 12 7 H
osd_layout 3 104 0 0 H
osd_layout 3 105 3 5 H
osd_layout 3 106 1 2 H
osd_layout 3 107 1 3 H
osd_layout 3 108 7 4 H
osd_layout 3 109 7 7 H
osd_layout 3 110 22 11 H
osd_layout 3 111 23 9 H
osd_layout 3 112 24 10 H
osd_layout 3 113 1 1 H
osd_layout 3 114 1 2 H
osd_layout 3 115 1 3 H
osd_layout 3 116 1 4 H
osd_layout 3 117 8 11 V
osd_layout 3 118 21 12 V
osd_layout 3 119 0 0 H
osd_layout 3 120 0 0 H
osd_layout 3 121 3 4 H
osd_layout 3 122 3 5 H
osd_layout 3 123 3 6 H
osd_layout 3 124 23 2 H
osd_layout 3 125 0 0 H
osd_layout 3 126 0 0 H
osd_layout 3 127 0 0 H
osd_layout 3 128 0 0 H
osd_layout 3 129 0 10 H

save

Changes for use with ExpressLRS HYBRID_SWITCHES_8
As we cannot use the full 21 position parameter switch. We need to modify the model and perform an update in the CLI. First, lets update the transmitter model.
Firstly, go in to the mixer and edit the mix for Ch 12, Adj P. We need to activate curve CV2:ELR.

Next, we need to change some special functions, to limit the movement of the channel. Change the switch of SF34 to L35. Then change the increment and decrement values of SF35 and 35 to 12 and -12 respectively.
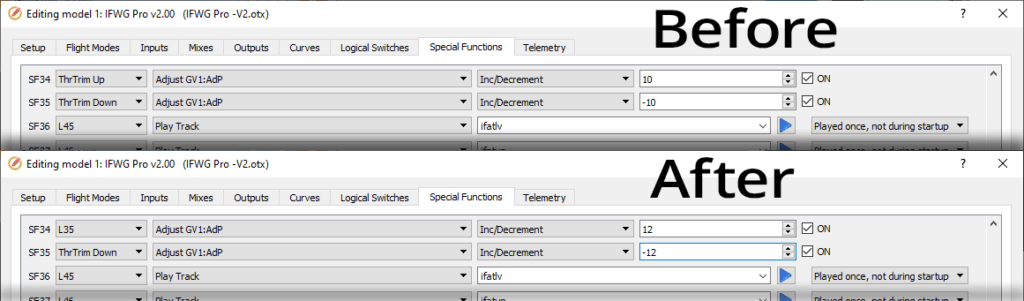
Finally, we need to update the CLI.
CLI changes for ExpressLRS HYBRID_SWITCH_8 mode
# Adjustments
adjrange 0 0 7 1025 1075 14 6
adjrange 1 0 7 1100 1150 15 6
adjrange 2 0 7 1175 1225 16 6
adjrange 3 0 7 1225 1275 17 6
adjrange 4 0 7 1300 1350 10 6
adjrange 5 0 7 1375 1425 11 6
adjrange 6 0 7 1425 1475 12 6
adjrange 7 0 7 1500 1550 13 6
adjrange 8 0 7 1575 1625 21 6
adjrange 9 0 7 1625 1675 23 6
adjrange 10 0 7 1700 1750 24 6
adjrange 11 0 7 1775 1825 5 6
adjrange 12 0 7 1825 1875 36 6
adjrange 13 0 7 1900 1950 32 6
adjrange 14 0 7 1975 2025 33 6
adjrange 15 0 0 900 900 0 0
adjrange 16 0 0 900 900 0 0
adjrange 17 0 0 900 900 0 0
adjrange 18 0 0 900 900 0 0
adjrange 19 0 0 900 900 0 0

save
Customising this model
If you are looking to customise this model, this page may help you.
Changing or removing the start up sound

When you load this model, you will hear “INAV Fixed Wing Group”. This is the default start up sound for the model. This can be found in the Special Functions in SF1. To change this to a different model, just select one from the list of available sounds. All model names in the IFWG Sound Pack begin with the letters im. There is a list of model name sounds in the _Sound Pack vx.txt file that comes with the sound pack. If you don’t find your model, you can request it to be added on the Sound Pack page.
To remove the sound completely, use the Clear option. This can be found by right clicking in Companion, or long pressing Enter on the transmitter.

Change Log
V2.00
20th of February 2022
New feature, and update
- Added support for ExpressLRS HYBRID_SWITCHES_8 and WIDE_HYBRID modes:
- Outputs set at -97.7 to 97.7 to get 1000 – 2000 microseconds.
- Modes (Ch 6) changed logic for setting the ELRS spacing.
- OSD (Ch 7) Added OSD curve with ELRS spacing.
- Adj V moved to Ch11. This is what changes the values up or down.
- Adj P moved to Ch12. This is to get the most adjustment parameters possible with HYBRID_SWITCHES_8.
- Trims now only function in manual mode. This is a safety feature added, so that switching in to a stabilised mode is no longer effected by any transmitter trim.
- Updated for alignment with INAV 3.0 onwards (3D Cruise becomes Cruise, auto level etc).
- A total flight timer has been added, to keep track of the total hours of the model.
- Default model images and load model sounds have been added.
V1.04
12th of December 2020
- Fixed issue where the OSD menu would not be opened (flashed on screen then disappeared).
- Added alert if auto-tune used in flight, reminding you to save.
- Updated SoundPack to V2.03.
V1.03
2nd of November 2020
Bug fix
- Fixed issue with servo autotrim and auto tune. They would not be active in the in-flight tuning OSD when not adjustments are active; when they should have been.
V1.02
12th of October 2020
New features and update
- Added Jumper T18 OpenTX model
- Added feature to make it easier to set the correct arming position
- Updated SoundPack to v2.01
V1.01
12th of October 2020
Bug fix
- Corrected the arming status for the multi-function momentary switch.
V1.00
27th of September 2020
Initial release