Understanding FrSky


- Understanding FrSky
- Point of Confusion #1: Firmware
- Modules
- Point of Confusion #2: Firmware, again!
- Point of Confusion #3 : FrSky Protocols
- So what firmware should you use?
- Point of Confusion #4: How do you get the firmware?
- Flashing your firmware on your receiver
- Point of Confusion #5: How to wire them correctly to your flight controller
- What if you have ACCST, should you buy ACCESS?
- Summing it up
- Appendix A: Non- OpenTX Systems
- Appendix B: Finding the un-inverted S.Port on your receiver
- Appendix C: ACCST V2
The point of this article
Judging from the posts in the INAV Fixed Wing Group, people who are very bright and have a lot of experience with RC Flying can be confused. So, if they’re confused, just about anybody can be confused. The point of this article is to give you an overview of the subject with enough information for YOU to dig deeper. This is simply an overview, not digging through minutiae, because when it comes to FrSky the minutiae is very thick.
We’ll highlight areas people get confused so that hopefully you can understand it better. If you’re still confused, or if you feel we haven’t addressed a topic well enough; or worse yet, we made mistakes, please send me a message at here.
Point of Confusion #1: Firmware
On the FrSky website they mention “Firmware”. Also, when you read the first sentence on the OpenTX website it says “OpenTX is open source firmware for RC radio transmitters.” So, are there two different types of firmware that go on an FrSky transmitter? Yes! If you want to simplify things, think of OpenTX more like an operating system than a firmware. When it comes to firmware you could be utilizing 3 different firmwares on your transmitter. The operating system firmware, and the internal and external module firmwares. Thus, there are three different types of firmware that you need to keep track of.
The Transmitter’s Firmware
When we say “OpenTX” and “EthOS” we are talking about the operating system of your transmitter because, essentially it is a computer. You aren’t required to update this particular firmware on your transmitter. But, updating the firmware on your transmitter is like performing a Windows update. It can fix bugs and add more features for you to use. The OpenTX firmware changes quite a lot. So, you may feel compelled to update it a couple of times a year. Then again, you may go years without touching it if the transmitter is working fine and you have no problems.
OpenTX & EthOS

OpenTX and INAV have a lot of similarities. They are both open source firmware. INAV works on flight controllers, OpenTX works on transmitters. They both have steep learning curves. Though, we have made things all too simple with our group OpenTX Model, which you can download and save a ton of hassles thanks to Darren Lines. This group model is really a no-brainer. You can start off with it, and perhaps build your own later on. Darren (Mr. D) has videos on setting up OpenTX radios. Darren is fabulous at explaining how things work and these videos are truly treasures. Darren will take you all the way through OpenTX in his videos and thus, we’re done talking about it, other than to simply say that you really want it.
EthOS is a firmware, coming from FrSky in April/May 2021. Unlike OpenTX, EthOS isn’t open source. When you buy certain new models FrSky radios, it’ll come with EthOS installed. It’s very new and we’re not going to say a lot about it. However, FrSky have a website that can wonderfully explain the benefits of EthOS. Depending on the transmitter, you may be able to flash OpenTX to the radio, It’s your choice. Everything else discussed pertaining to protocols, firmwares and binding for the most part are separate from OpenTX and EthOS.
Modules
Modules are the common names given to the part of the transmitter that sends the signal from your transmitter to your receiver. There are two types of modules, internal or external. So far so good, right? Both the internal modules and external modules have their own firmware.
Internal modules
So, the internal module is the transmitter inside the radio that sends the signal to the receiver. Depending on the radio you have, you’ll see the names like XJT, ISRM with FrSky, or Multi-Protocol with radios like the Jumper or RadioMaster.
XJT
This internal module is 2.4ghz radio communication. The XJT module runs the ACCST protocol, and can use the modes below.
D8
D8 is an older mode that is no longer supported by FrSky. This is used for V series and D series receivers. These are older receivers, which are no longer officially made. There are clone D8 receivers however, that can be found in things like Tiny Whoops.
LR12

LR12 is a 12 channel mode used for L Series receivers, which is pretty much the L9R. These are long range receivers on 2.4ghz with a solid following. They have an extended range over regular 2.4GHz receivers, due to an amplified receive antenna. This however means that it cannot have telemetry (we’ll cover telemetry later).
D16
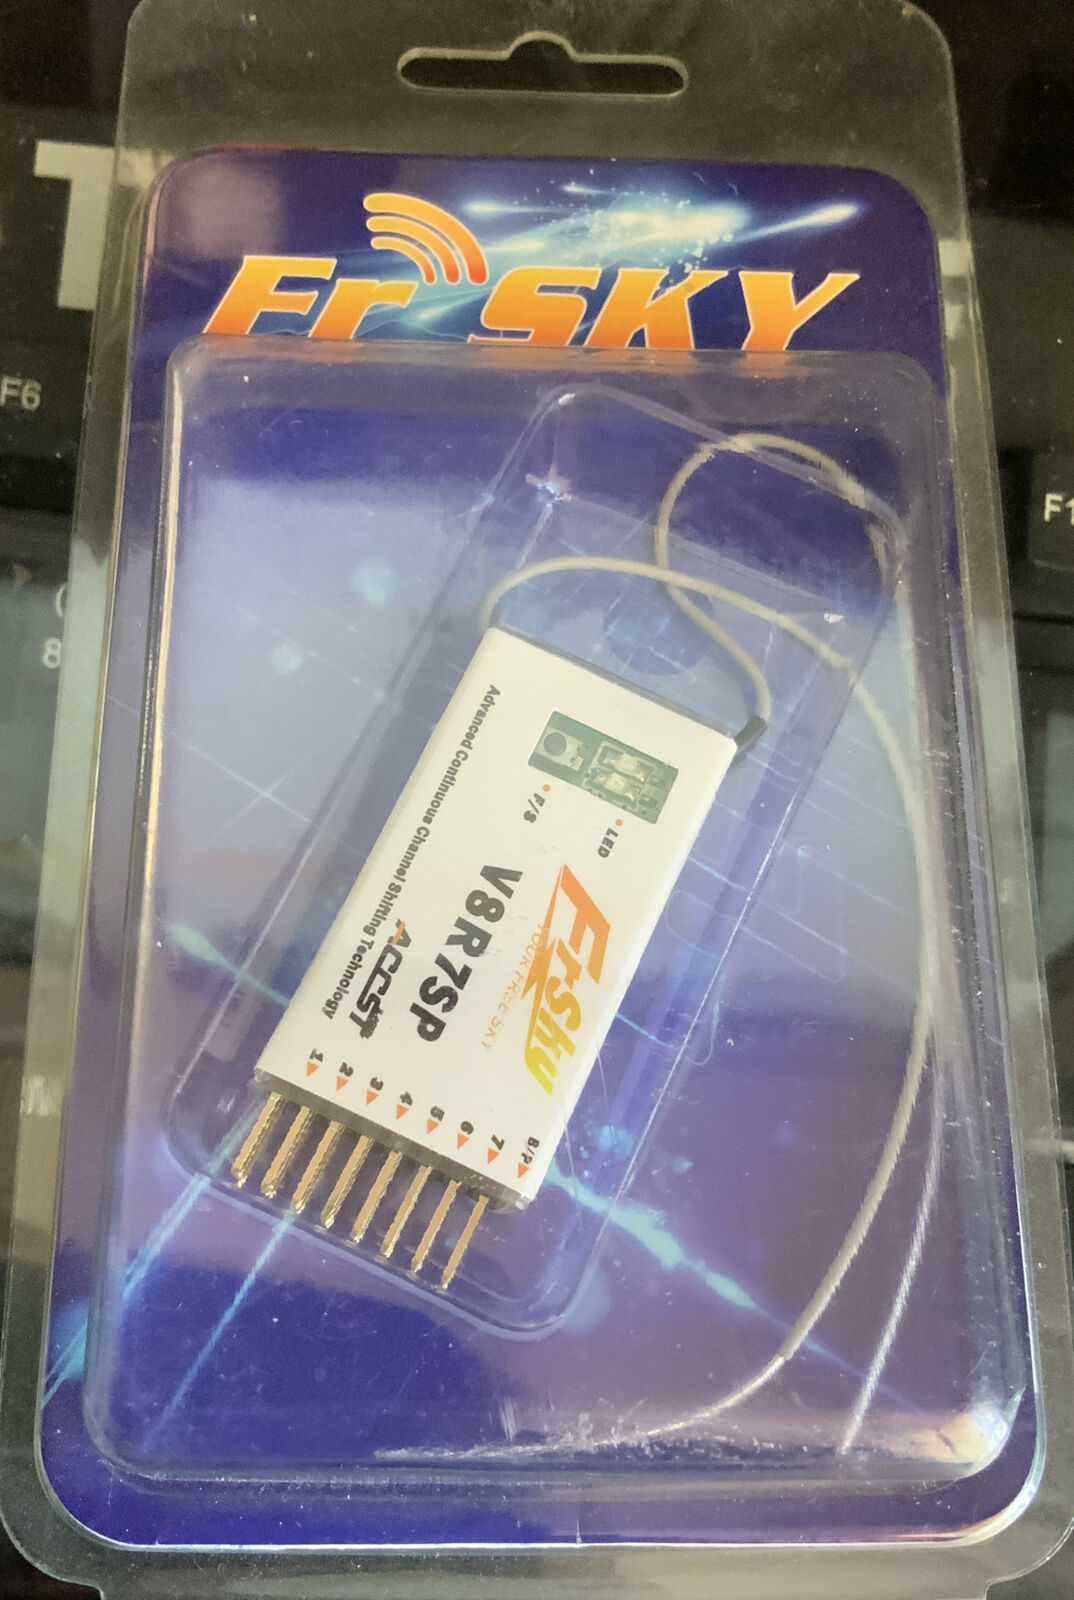
D16 is a mode in ACCST, used with X, XM, S, and RX Series receivers. These include popular receivers like the XM+, S6R, and RX6R. D16 uses 16 channels, and for the most part, has telemetry. D16 is the only mode currently available on ACCST v2 on ISRM modules.
ISRM
ISRM is the new 2.4Ghz internal module for FrSky transmitters. It runs the ACCST v2 (D16 mode) and ACCESS protocols.
Multi-Protocol
The multi-protocol module started as an external module DIY project. But, with the advent of the Jumper T16 and RadioMaster TX16S transmitters, the multi-protocol module was made to fit inside the radio. These modules can run a whole range of protocols. Though, most of these are not open source, so the licencing is a grey area.
External Modules
On the back of your radio, there will be a JR bay of some description. The standard JR bay is quite a large recess on the back of your transmitter. The new JR Lite bay looks more like a slot with pins at the bottom. However, standard JR modules can be used with the JR Lite bay too, by using an adapter. These bays give you a lot of options. Here are a few:
XJT Module

We just covered XJT as an internal module. So why have it as an external module? These have actually been around for around 10 years. They allow people with non-FrSky radios to use the ACCST system. However, these days, they can be used with an FrSky ACCESS transmitter to allow you to keep using ACCST v1, including D8 and LR12 modes. You can put version 1 of ACCST on the external module and keep the internal module on ACCST version 2.
Multi-Protocol

This isn’t an FrSky product, but hey, what a great place to talk about this. The multi-protocol module allows you to use a wide range of protocols from different transmitter manufacturers. This module is the iRangeX IRX4. With this you can use your FrSky transmitter with all those toy drones that come with their own remotes. Depending on the module, it can work with FrSky D8, LR12, and D16, Spektrum DSM2 and DSMX, Futaba, FlySky, and many more. There are transmitters that are sold as multi protocol. But you can use a high end FrSky transmitter to fly all those toy woops and planes you may have lying around the house using a module.
R9

R9 is FrSky’s 900MHz, long range system. There are a couple of different R9 transmitter modules. They all work with the R9 receivers. However, you need to be mindful of the protocol the module is running when choosing the receivers. Also, with the new X20 transmitters, the R9 module will be an internal module.
On the right is the R9M 2019 module. Protocols on the R9 is fairly easy to understand. There are only two flavors of full size R9 modules; which are easy to tell as the label on the back is pretty clear. The R9M (ACCST) and R9M 2019 (ACCESS). So, the R9M (ACCST) module can only run the ACCST firmware. It can be used in any transmitter. But, it can’t use ACCESS receivers, with the exception of the R9, R9 Mini, R9 MM, R9 Slim, and R9 Slim+ receivers and their -OTA variants; these can be flashed with the ACCST firmware. If in doubt, look on the receiver’s firmware download page on the FrSky web site. The R9M-2019 module (ACCESS) can be flashed with either the ACCST or ACCESS firmware. But, to use the ACCESS firmware, it must be used with a radio that supports ACCESS external modules.

The R9M Lite and R9M Lite Pro are small modules for transmitters with a JR Lite bay. Below is a photo of a X-Lite Transmitter, which has a JR Lite bay. The R9M Lite modules can use either ACCST or ACCESS firmwares. But to use ACCESS, the radio also has to support ACCESS.

If it looks like a video game controller you’re right. My feeling is that people who grew up on video games have a natural inclination to flying FPV and FrSky probably feels the same by making something more familiar for gamers. It’s also a great choice for people with smaller hands, or want to throw a small transmitter in their backpack. People who fly high precision race quads tend to enjoy this as well.
Point of Confusion #2: Firmware, again!
No, this is not a misprint. The Firmware side is so confusing, it’s being mentioned twice! Everything needs firmware. Your internal modules need firmware, your external modules need firmware, even the transmitter needs firmware. One of the largest problems people have with FrSky, is people mix up their firmware. What you put on your module has to match up with what you’re using on your receiver. ACCESS receivers (Archer & R9) will ship with ACCESS firmware. ACCST receivers (X, XM, S, RX series) will ship with ACCST v2 firmware. Some receivers (RX, R9 -OTA) can use both firmware types. One thing’s for sure. If you use ACCST v1, you will need to flash your ACCST receiver before you can use it.
One other terms that affect firmware
LBT
Listen Before Talk is a legal requirement for the European Union markets. It means that the transmitter will check the interference signal level before starting the transmission. The device continuously monitors channels so as to transmit only when a channel is not in use.
FCC
FCC firmware is used wherever LBT is not a requirement. But, if you have the wrong firmware for your region, you can just flash the right version. You have to keep these straight as well. They don’t mix.
As a side-note: if you use ACCESS, you only need to worry about having the correct LBT or FCC firmware on the modules. The receivers will automatically be set to the correct region.
2.4GHz Vs. 900MHz
2.4GHz is one of the frequencies WiFi works on.There are many, many channels available in the range; thus, you can fly your plane on 2.4GHz and get decent range. I am finding that the range is good until around 1.6km in residential communities. Thus, if your intent is to do park flying and stay close to home the receivers in this range are very simple and work well without additional modules and antennas. For a simple park flying experience that is fast and easy, 2.4GHz is the way to go.
2.4GHz is a good thing to start off with. It’s pretty simple. The downside to 2.4 is that you’ll run out of range fairly quickly and hit failsafe. The receiver will tell the flight controller that it’s no longer talking to the transmitter. The flight controller will then head back to home if you have RTH set up as failsafe in INAV. What I can say from experience is that failsafe for 2.4GHz are fairly common. I’ve had failsafe occur at 200 meters out. My thinking is that it’s a combination of factors such as antenna placement, altitude, orientation of the plane and simple bad luck that cause this to occur. INAV of course takes over and things are fine.
If you would like to do mid to long range flights then you really should look into 900MHz. People who like to fly shorter range also like this because they enjoy the more secure signal and fewer opportunities for failsafe.
Point of Confusion #3 : FrSky Protocols
When the US Diplomat meets with the representative from France in Paris things need to be figured out in advance before butts are in chairs. What language will they speak? What customs must they follow (not meeting during holidays). This is known as “protocol.” Your transmitters and receivers use protocols too. This is a point where a lot of people get confused. ACCST is like speaking English and ACCESS is like speaking French. You cannot have your transmitter speaking English when your receiver only understands French. You need to have your transmitter and receiver on the same page.
Note: Some time has passed since we originally worked on this article. We made reference to an article someone wrote that was very in depth, but unfortunately lacked correct information at the end. Thank you Ray Morris for pointing out this inaccuracy. Since we do not wish to perpetuate misinformation about FrSky, the reference has been omitted.
ACCST
Advanced Continuous Channel Shifting Technology, or ACCST, has been around since 2010. If you’re running with a FrSky radio system that isn’t a 2019 or newer model (they usually have 2019, ACCESS, or Express in their names), you will need to use the ACCST protocol. The pre-2019 transmitters have an XJT module, and the 2019 onwards models have an ISRM module. This was a source of confusion. ISRM supports D8 and L12R. Check it out for yourself.
ACCST V2
In January 2020, FrSky released ACCST v2. This version came after pilots in Europe discovered a bug (in 2013!) that would lock servos, causing their models to become expensive, moulded lawn darts. This problem was found more easily because of the ever increasing noise floor in the 2.4GHz band. This is why the problem was not or rarely seen in the early days of ACCST, but got progressively worse over time. ACCST v2 fixes this problem. Encryption was also implemented in this release. When ACCST v2 was implemented on the ISRM module, D8 and L12R was eventually included. Thanks Ray Morris for your correction on this topic.
ACCESS
Advanced Communication Control and Elevated Spread Spectrum, or ACCESS, is the newest protocol from FrSky. It has a lot of useful features and is very promising, as long as you have compatible ACCESS hardware. One of the benefits of ACCESS is the ability to do Over The Air (OTA) updates and settings changes on your ACCESS compatible receiver.
But hey, some people can speak English and French
Remember the analogy before was that ACCST was like English and ACCESS is like speaking French. Well, some of the hardware turns out to be bilingual. The ISRM module that “speaks” ACCESS, can also communicate with ACCST v2. You can select this in the internal module section of the model setup page. Some receivers can also speak either language, but only one at a time by flashing the appropriate firmware.


So what firmware should you use?
After reading all the information above. Hopefully you now have a better understanding of the different types of firmware, the protocols, and their limitations. In some situations the choice is very easy. But sometimes you may need to make compromises. Here are a couple of scenarios that might help you decide.
I am completely new to RC and FrSky. I’m starting with all new equipment
Congratulations! You have the easiest time of all. Quite simply, use ACCESS. If you have no old receivers, so go with the ACCESS protocol, and have an easier life when it comes to binding, settings, and updates.
I am new to RC and have just bought a used FrSky radio. I have no receivers yet
You’re still in a pretty good position. First, look up your transmitter and see which protocol it can use. If it can use ACCESS, go with that. If it’s an older transmitter and can only use ACCST, you should go for the latest ACCST firmware. Just make a note that you will be limited to X, XM, S, and RX receivers. D8 and LR12 will not work. But, as you currently have no receivers, this shouldn’t be a problem.
I have an old (non-ACCESS) FrSky transmitter and receivers
You are actually in a pretty nice position in terms of keeping things simple. You can only use ACCST, and all modes are still supported. So, the simplest option would be to use ACCST v2. This is the latest firmware, so is easily accessible. The only downside, is you would need to update all your D16 receivers to do this.
I use R9M ACCST
There is only one real choice for this system, and that is ACCST Flex firmware version 190117. This firmware has been stable since February 2019. You can only use the R9 Mini, R9 MM, R9 Slim+, R9 STAB OTA, R9 Slim+ OTA, R9 MM-OTA, or R9 Mini-OTA receivers. Only the OTA receivers are still sold. These receivers are shipped with ACCESS, so will need to be flashed with ACCST. Note, the OTA firmware version numbers are different. But the latest version of ACCST will work.
I use R9M-2019
Does your transmitter support ACCESS? If not you will need to use ACCST. You can only use the R9 Mini, R9 MM, R9 Slim+, R9 STAB OTA, R9 Slim+ OTA, R9 MM-OTA, or R9 Mini-OTA receivers.
If your transmitter supports ACCESS, you can use R9 ACCESS and take full advantage of the system. All R9 receivers can use ACCESS. However, some of the earlier receivers don’t support the OTA features.
In all cases
Make a note of the firmware that you have installed on all your modules. This will help a great deal in the future.
Point of Confusion #4: How do you get the firmware?
This may sound like a simple task. You just go to the FrSky web site and click download right? Kinda.You go to the FrSky site and first find the product you want to download the firmware for. There is a menu straight to download. But the product side is easier to navigate. Once you’ve found the product, click the DOWNLOAD tab and then the Go to Download page link.

If you want to download ACCESS firmware, you should choose option 1 (shown with the 1 in the green arrow). Check the version number and make sure that the major version matches what is on your ISRM module. If the version is quite different, you should think about updating your ISRM module. Note the changes for the RSSI warning in red at the top of the ACCESS section.
If you want to download ACCST v2, option 2 is the one for you. Again, check the major version against your ISRM or XJT module.
If you are using ACCST v1, you need to click the word DOWNLOAD in the link shown by arrow 3. Only the last version of ACCST v1 is available, so all ACCST v1 will match.
I’d recommend downloading the firmware for all the receivers you have and store them on your transmitter’s SD card.
Flashing your firmware on your receiver
If you’re using ACCESS, this task is very simple due to OTA updates. What this means is that you can flash your ACCESS firmware without wires. Here’s a video on how to do it. The process involves binding the receiver and flashing the RX “over the air” with your transmitter. Pretty clever! So, you have to have both an ACCESS transmitter and an ACCESS receiver to use the OTA updates. You will also need a fairly recent version of OpenTX (2.3.7 and above) on your transmitter.
If you’re flashing an ACCST receiver, you need to use a cable. Don’t worry, it’s nothing fancy, you can just join 2 old servo cables to make a flashing cable. Just be careful if you are using the JR bay, as the cable order is different. This is the process to update your receiver the old fashioned way, with wires using your JR port in the back of your transmitter, or an S.Port socket if you have one on your radio. Lee at Painless 360 has a great video about Flashing your FrSky Receiver. It’s not that bad to do it this way once you’ve done it a couple of times.
Point of Confusion #5: How to wire them correctly to your flight controller
UARTs and Inversion
So before we even get into the wiring, we need to talk about something that you would have no doubt heard of. Inversion. If you’ve ever used a FrSky receiver, you will have dealt with this, but possibly without knowing about it. If you want to know more about UARTs and inversion, this is a video that should answer the questions. But, we’ll cover the basics of inversion here too
So for this example we are going to have a UART, and it is sending out some data which looks like 01001000 01101001. Most of what we use on our flight controllers communicate in this way. However, the FrSky receivers use inverted UARTS for their SBUS and S.Port connectors. This means the 0s and 1s are flipped. The problem is that unless the other device talking with the receiver expects this, it won’t understand a thing. Remember our English and French example. Well this time we have a spoken word record in English, only it’s being played backwards. For example:
Normal signal   - 01001000 01101001
Inverted signal - 10110111 10010110
Our normal signal here is actually saying Hi. But the inverted signal comes out as · if it’s not un-inverted back to a normal signal.
That hopefully seems pretty straight forward. But FrSky decided to add one more level of confusion with the “inverted SBUS” and “inverted S.Port” pads on some receivers. So what do they mean by this? Well, we know that the SBUS and S.Port signals are inverted. So “inverted SBUS” and “inverted S.Port” are an inversion of an inversion. To put it simply, they are uninverted.
So how do we deal with this? On F3 and F7 flight controllers, it’s pretty simple. All UARTs have on chip inverters, which can be turned on or off through the firmware. So if we are using the SBUS or S.Port pads, we just need to tell the UART that the signal is inverted.
What about with F4 based flight controllers? You’ll usually find that the manufacturers of these boards will have an SBUS pad. This is simply a connection to a UART through a hardware inverter. For example, the Matek F411-WSE has 2 UARTS. UART 1 is just a standard UART. But next to UART 2 there is a pad labelled SBus. The SBus pad is Rx2, but with a hardware inverter in line. If you’re using S.Port, you will usually connect this to a SoftSerial pad. The F411-WSE actually remaps Tx2 to SoftSerial 2 for SmartPort.
If you have “inverted SBUS” and “inverted S.Port” pads on the receiver, like the R9 Slim+; you can just use those connections on any standard UART. Likewise, if you want to use F.Port, you should use the “inverted S.Port” pad and connect to any standard UART Tx.
Going over all the pads
In our example we’ll use the pads for a FrSky R9mm. Let’s start with the easy pads first.
GND & V_In
Pretty easy to understand. GND is the ground pad. This will go to a GND pad on your flight controller. As for V_IN, this receiver works on DC voltage from 3.5v – 10v. We’re usually using 5v or 4.5v or somewhere around there. V_In is used because there is a range for the input voltage. Some receivers will only take a set voltage, for example +5V on the XM+. It is worth checking the specs for the receiver.
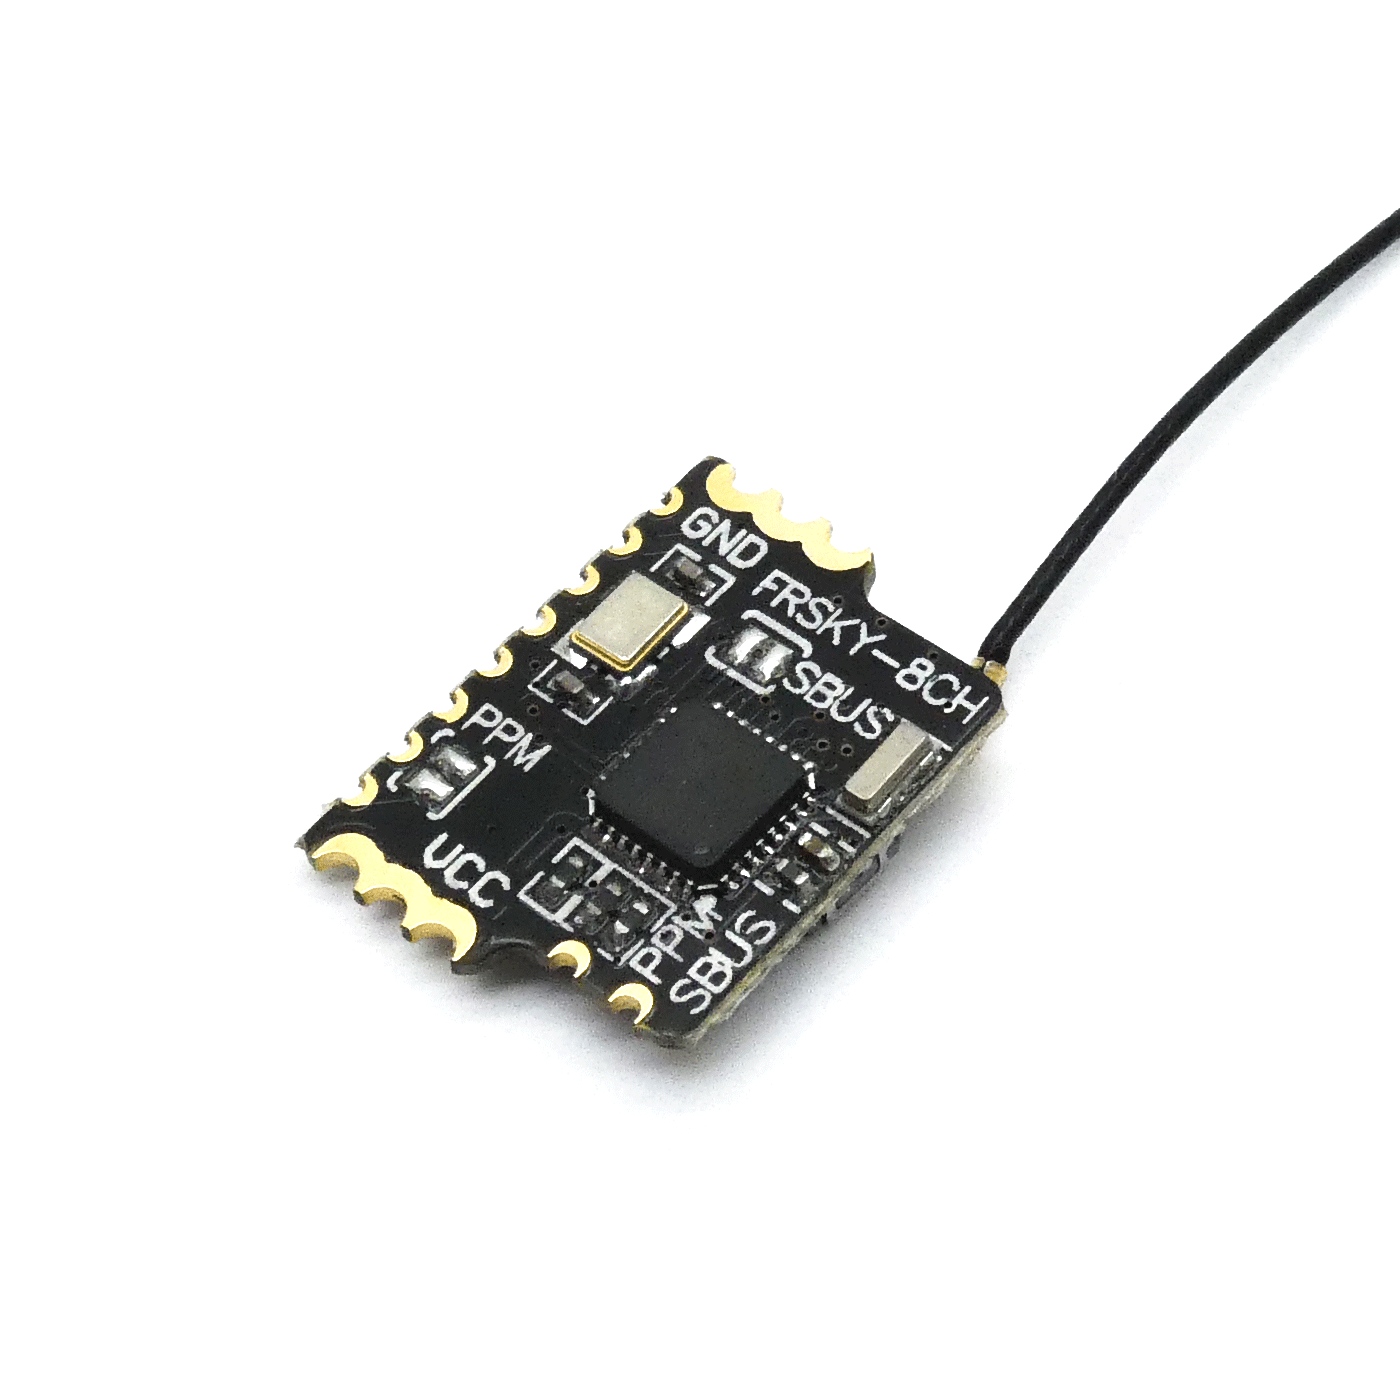
SBUS

To discuss SBUS let me show you an image of a very basic receiver. This is the FrSky XM+, it’s about as simple as you can get for a 2.4gHz receiver. There are only 3 pads: GND, +5v, and SBUS.
You will of course want to use lots and lots of switches in INAV. The switches need to be sent to the transmitter. For this, we use channels. This receiver can handle 16 channels on one simple set of servo wires. In Appendix 1, I’ll go over channels.
You can think of SBUS like a train. The train has a car, which is our metaphor for a packet. This train car can only carry 8 passengers. The channels are like the passengers, and the transmitter and receiver are stations. As our train can only carry 8 passengers at a time from the transmitter to the receiver; if you need to send 16 passengers, this takes two train journeys. Once the Rx gets all the passengers, they are sent to the flight controller, which listens to what they have to say. That is an overly simplistic description of SBUS. This is a video Deep Dive on the SBUS Protocol. The video describes of the standard SBUS packet is 25 bytes and how your flight controller reads 11 bits instead of 8. It’s all 0s ands 1s in a predictable delivery system.
The take away from this is that your transmitter can send out a tremendous amount of data and your flight controller can unpack it. Though this sounds big and complex, if you streamed something over your WiFi, it’s over 60 million pixels per second that needs to be populated. Compared to live video, the data stream for an SBUS signal is fairly simple. If you look at your flight controller utilization when you have it plugged in you’ll find that that processor is running around 3% utilization. Your flight controller’s processing utilization is like a Formula F1 car slowly driving through a parking lot trying not to hit people.
Telemetry (The receiver talks back)
So, we talked about the basics, we’re up to three wires, ground, voltage and SBUS. That’s enough information to fly a plane. But, we don’t stop here. What if the receiver could talk back to the transmitter and tell it important information such as signal strength, location, altitude and other important things? The talking back is known as telemetry. The flight controller can share a bunch of useful information with the receiver. Then the receiver can send it back to the transmitter to display on it’s screen among other things. While you’re flying a mission you may lose your video signal but your transmitter may still be in range and could still display altitude, heading, signal strength, battery voltage and a bunch of other useful information to keep you informed about the location and status of the flight.

From this screen I can tell someone is flying an AR Wing, it’s approximately 3km away, 420 meters up, has been flying for about four minutes, is in a cruise mode, is flying away from home, drawing 4 amps and 61 watts, and the cell voltage is around 3.85v on a 4S battery. The plane is flying north and should it go down the GPS coordinates are on the screen. The GPS has acquired a 3D fix from 15 satellites.
If you lose video, wouldn’t you want to see this? If you want to come back home you can either engage “Return To Home” or turn the plane until that triangle on the bottom is heading north. This is running on an FrSky X10S. This is a LUA script, to show this data on the radio. We won’t be discussing how to set it up. But, once again Painless 360 has an introductory video on LUA Scripts.
S.Port
SmartPort, or S.Port for short, can be used for telemetry. This is what we use to listen to the flight controller and feed back information to the transmitter.
Telemetry wiring
If you want to wire up telemetry, it may be as many as one more wire needed. The flight controller needs to send back information (via a Tx pad on an available UART) to your receiver, to send back information to your transmitter.

Here’s a nice diagram borrowed from the great Oscar Liang. From bottom to top on the flight controller: ground and 5V go to the power pads on the receiver. The green wire shows telemetry wiring. It goes from S.Port on the receiver to the Tx pad on UART 2 on the FC. SBUS on the receiver goes to the Rx pad on UART 1. This is an F7 flight controller, so all the inversion is handled in the processor. On an F4 board, the SBUS could hook up to the SBUS pad instead. But the point remains, the red and black (grey in this example) wires are for power. The receiver talks to the flight controller via the blue wire, and the receiver listens to the flight controller on with the green wire.
Back to inversions
We mentioned inversions earlier. So now here’s an example of how to use them to make your wiring simpler.

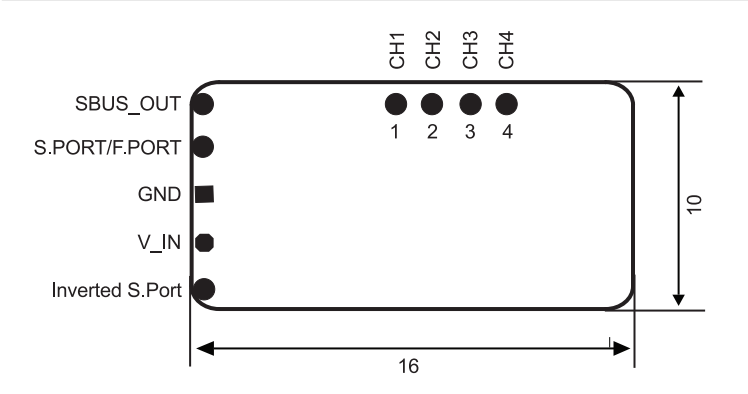
In the image on the right, you can see there is an “inverted S.Port” pad on this R9 MM receiver. So we will be talking about that. But the same applies to “inverted SBUS” pads, if the receiver has one.
To keep things simple, look at this image above. F7, H7, or older F3 flight controllers can use the S.Port signal next to the SBUS_out pad. The F7, H7, or F3 will just un-invert the signal in the processor. The F405, F411, or any other F4 flight controller, should use the “inverted S.Port” pad. This means you don’t need to use SoftSerial or another hack to send the correct information. You can just use a regular UART Tx. If you are using “inverted SBUS” on an F4 flight controller, you don’t need to use the flight controller’s SBUS pad. Just use any UART Rx.
What if your receiver doesn’t have an inverted S.Port?
If your receiver doesn’t have an inverted S.Port (such as the R9 Mini) you will have to use “SoftSerial” in which the CPU converts the signal on the fly. As mentioned before the CPU isn’t really working that hard, so this is a very simple task that won’t weigh it down. Here’s a video from Pawel that shows how to configure SoftSerial so that you can use the same uart for SBUS and S.Port.
F.Port
By now we’ve done all the heavy thinking, so it’s time for a simple concept. F.Port is a container that holds both SBUS and S.Port on the same pad. If you’re using ACCST, you will have to flash the F.Port firmware on the receiver. For ACCESS, you can just switch it on and off in the bind settings menu.
Remember this image?
You can see the second pad from the top is either S.Port or F.Port. This will depend on your firmware or settings, as mentioned above. To make things really simple, if there is an “inverted S.Port” pad, just use that for F.Port. Hook it up to a UART’s Tx pad on your flight controller.
It’s a little more complex if the receiver doesn’t have an “inverted S.Port” pad. For H7, H7, or F3, you can connect to the UARTs Tx pad, and turn on inversion for that UART.
With the F4, if the flight controller doesn’t have an S.Port pad with a bidirectional hardware inverter; you will have to find a hack point on the receiver with a pad that has the uninverted F.Port/S.Port. Though this can be a very small soldering job. You should not use SoftSerial for F.Port, it’s slow. Here’s an example from Matek’s website on the new F405-WSE flight controller.

Notice that they are specifying an uninverted signal, so you must use the “inverted S.Port” pad or a hacked pad on the receiver.
What if you have ACCST, should you buy ACCESS?
I wrote in simplistic terms because quite frankly this is a bit of a difficult subject. And trust me, there’s a ton of other things not covered. There are deep channel hacks to make your Jumper or RadioMaster TX work with ACCESS external modules. You can find the right articles for this if you aren’t afraid of a bit of soldering. If you haven’t made the jump yet to OpenTX at this stage I would say that FrSky does have a compelling story to share about their ACCESS protocol, and it has advantages over ACCST. Particularly the OTA updates and settings.
If you’re like me and many other people, and you’re happy with ACCST, there is no necessity to change. ACCST receivers will likely be around for a while yet. However, at some point FrSky may make a transmitter that you just love and want. Maybe there’s something ACCESS does that you want to use. In which case you can switch over to ACCESS.
If you’re using ACCST v1 and want to move to an ACCESS transmitter, you will need to reflash the firmware on your D16 receivers. If you want to use D8 or LR12, you will need an XJT external module. At the current time I cannot think of any specific reason for me to dump ACCST and buy an ACCESS transmitter. But, over the years there will be many great new FrSky transmitters coming out and I will break down and buy one. At the end of the day, this is your decision.
Summing it up
- You will not lose anything if you go from ACCST v1 to ACCST v2. The limiting factor for modes is the module, so if you are using the same transmitter, everything will still work. You just need to update the D16 receiver’s firmware.
- 2.4Ghz Vs. 900mhz: 2.4 is fine to start off with. But if at some point you want more range, you could get into 900mhz If you want to use TBS Crossfire, more power to you. FrSky R9 is also very good.
- If you have an ACCESS transmitter, using ACCESS is a no brainer. The transmitter will say ACCESS or ACCST on the front. Sounds simple but people often ask about why ACCESS isn’t working on their ACCST transmitters.
- SBUS is the receiver talking to the transmitter. It can use up to 16 channels on ACCST. However, on ACCESS this goes up to 24 channels.
- S.Port can be used for telemetry. Telemetry is the receiver listening to the flight controller and relaying information back to the transmitter.
- SBUS and S.Port are inverted protocols. Thankfully, on some receivers there are “inverted SBUS” or “inverted S.Port” connections. These are access points for uninverted signals. However, if you don’t have an inverted S.Port and you’re using an F4 flight controller you can use SoftSerial to get S.Port to work.
- F.Port is a container for S.Port and SBUS on one wire. But, you need to have the right version of firmware on your receiver to utilize F.Port with ACCST. You should never use SoftSerial for F.Port.
- Look at the wiring diagrams for your flight controller.
- Keep track of what firmware you have on your transmitter modules. Also, download the receiver firmware for those modules and store them on your transmitter’s SD card.
This is where you will need to take some time and figure out what firmware your transmitter is using, perhaps there is an update? It’s also a good time to update OpenTX. You will also need to plan your wiring according to your firmware and your flight controller. Before you start soldering, start peeping around in the group and don’t be afraid to ask questions. Once you get this all sorted out, you’ll be golden. Instead of abandoning FrSky, take a bit of time and figure things out. Once you get it working to your satisfaction, you’ll be happy. Once you’ve got it all figured out, it’s not really that complicated either.
Appendix A: Non- OpenTX Systems
Manufacturers
Spektrum, Futaba, Hitec, FlySky- These are popular names for radio systems, each one is proprietary. These radio systems are often geared toward people flying patterns at RC Fields are new hobbyists who don’t want to dig deeper into RC just yet.
We’ll start here because it’s the easiest way to understand how things work, and where you may have come from if you flew planes prior to hearing the words “INAV.” Let’s keep things simple, you buy a Sonicmodell AR-900 which is a flying wing and it is nearly complete, it needs a receiver and a battery. You plug in one servo in channel 1, the other servo in channel 2 and the servo connector coming from the speed controller in channel 3. The speed controller has a BEC (Battery Elimination Circuit) which is a fancy way of saying that it splits of 5V so that you can run the servos and power this receiver.
You bind, fly, crash, repair, fly again and have a very nice happy life. If you enjoy friends, a life, being married, family and free time, you should stop here. Oh, but as the Catholics say, you haven’t suffered enough. On we go! Confession time, for simple Line of Sight Flying (LOS) FlySky is fine, I use it to this day for park flyers.
Channels
Pay attention to the word “channels” because it comes up over and over again. The FlySky transmitter has six channels. In the last section we just used three of them. Let’s say we want to use all six channels. Well, you could buy a traditional plane like the Bixler 2. It has a rudder, two ailerons, an elevator and of course a motor. That’s five channels. You have one channel left over.
The Bixler 2 has options for flaps. So, the sixth channel will be flaps. But it can be something else like a buzzer or LED lights. There are some LED lights that change colors as you move the knob on your radio. The takeaway is that channels means that you can do stuff. Thus, more channels means you can do more stuff, right? This receiver says “6 channels.” The limit is that you can hook up six sets of servo wires. If you need more channels, well, you’ll need a different radio system.
IBUS
With some online digging you can modify the transmitter with a firmware hack to make it deliver 10 channels. Which is great, but this receiver only has six channels it can support. There is a little thing called “IBUS” which is a set of three pins on the top right. Through this one cable there is a serial transmission of data which means that this receiver can deliver as much as 10 channels to something like a flight controller with just one set of servo wire.
IBUS is similar to SBUS, they are both serial protocols. Before you run off buying a whole bunch of FlySky receivers like this one (not all FlySky receivers have IBUS) be warned that the transmitters have a limited amount of switches. I believe there is only one 3-way switch and two knob on the 6 channel transmitter. You can get your feet wet with INAV, but it’s very limited. But if you want to go this route, Andrew Newton has a great video about how to setup a flight controller using INAV and IBUS.
Appendix B: Finding the un-inverted S.Port on your receiver
The terminology FrSky uses is backwards. What FrSky calls “S.Port” is really an inverted signal, and what they call “Inverted S.Port” is actually an uninverted signal. Oscar Laing has an article Univerted SBUS and Smart Port on FrSky Receivers. If you’re up to doing a bit of microsolder you can find a hardware solution. Or, just stick to SoftSerial for S.Port. But never use SoftSerial for F.Port.
Appendix C: ACCST V2
Throughout this article, we have spoken about ACCST v2. We could have been more specific and said ACCST v2.1, as this is what we’re really regarding as ACCST v2. There was an ACCST v2.0 firmware, however it was very short lived, and removed from the site as soon as 2.1 was released. For all intents and purposes, ACCST V2.1 is V2. We just thought we’d save you even more confusion.


