Perhaps one of the most overlooked products in Matek’s line is a PDB. It’s rather remarkable when you consider what it does. This works with the F722-STD and F405-STD flight controllers (more on this later). Let’s dive into the specs.

- 3S-6S range, if you’re running 2S you won’t generate enough voltage for the VTX.
- 4 BECs? – Yes, you read that right.
- 5V 2A-Useful for your FPV camera, HD camera and LEDs
- 10V 2A- VTX voltage
- Vx, 5V, 6V or 7.2V Adjustable at 5 Amps!- These are for servos.
- LDO 3.3V 500ma for running you GPS and RX
A closer look

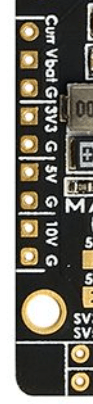
Servo pins
Don’t let the two row pins throw you off, the servos plug in horizontally, not vertically like you may be used to. There are4 servo outputs which work well with a plane with a tail and those without. Of course, the F405 Wing has more servo outputs, and thus if you’re looking for more than four servo outputs, the F405-Wing is a better option.
Hidden Uarts/ VTX wiring
The F405-STD flight controller offers the UART 5 RX/TX ports. But they are small solder pads which are somewhat hard to get to . Now, they are pinned an easy to get to.
The VTX is also on a pin, but the video signal is brought down through a small ribbon cable, so try it, if you don’t like it, you can wire up the VTX the old fashioned way.
VBAT Out
If you need full battery voltage out, there are a couple of pin pads you can use.
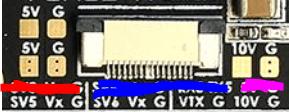
Two large 5V and G pads
Sometime you just need 5V out for things like LED lights. If there is one criticism about this PDB its that it’s way too generous with the amount of 5V outputs it has. The separate 5V regulator becomes important for things that can’t handle more than 5V when you’re using 6V or 7.2v to run the servos.
FCHUB connector
The FCHUB cable is a ribbon cable that carries over everything we’re about to look at on the left side of the board which includes power, and of course the UART channels. Some things go out to the flight controller such as power and current reading and some things come back such as the UART channels. Take your time installing the ribbon cable. You want to get it in straight otherwise there could be problems. Pins face up, blue side faces down and don’t twist the cable.
10V and Ground
If you want the largest, thickest and juiciest pads for soldering on your VTX power connections, here’s one for you. There is also yet a third set on the left side of the board. You can put on your 16AWG wire though it will reduced down to something less than 30AWG which often comes with the VTX. I just use 26 AWG wire on the left side of the board.
Left side outputs
Ground: Common Ground
10V: VTX
5V: FPV cameras and perhaps GPS
3.3V: GPS and RX
VBAT: Pack voltage, there are some high voltage LED lights that can deal with high current amounts.
CUR- This is the current meter, the PDB monitors the current and reports it back to the flight controller on this channel.
Top side of the board

This should look fairly straightforward for you. Right side comes from your battery. It can take a 3S-6S. Of course, someone will ask “What about 2S?” The flight controller will run with 2S but the VTX won’t work, and your servos may get weak or perhaps stop working if the voltage dips too low.
Let’s take a moment to ponder this great layout. A lot of pilots may have never used a soldering iron in their lives before starting this hobby. Their first soldering job may not be so wonderful. Thus the positive current on really shows up in two locations. You of course want to the keep the positive and and ground separated. But, if you get messy and the grounds touch, the board will still work. Same with the two positives in the middle of the left side. We want to be as clean as possible with our work, but, one small problem won’t kill the board.
The two sets of pads on the left bottom feed into your ESC.
G/M2/G/M1
These are for your signal wire to your motor(s). There are a few different options you can use to get this to work with your plane. The first is run single row pins through the holes. These single row pins don’t come with the PDB, you’ll have to source them on your own. As long as you’re sourcing them, you can pick up 4pin connectors so that you can run two sets of motor plugs straight onto the board with one 4P connector. You can just cut the ends off and solder the ground a M1 and/or M2 wires directly onto the board, this is fairly common. If you’re only using one motor and you’re super lazy, you can move the signal wire next to the ground wire and attach it to ground/M2 and let the empty slot sit on the 2nd ground pin. Be careful not to plug this into any other powered port or you’ll kill your speed controller.
6V/7.2V
Easy enough to understand. If you don’t touch this, the PDB will output 5V. If you want 6V bridge the two pads. If you want 7.2 V, bridge those two pads.
The question will come up, brace yourself. “I have both 7.2V and 6V on my plane, can I run it all on 7.2V?” Quick answer, no. You don’t want to get in the habit of overpowering your servos. The 7.2V servos will work on 6V. If you want to get all 7.2V regardless, run a 6V regulator from a spare 10V pad. If it’s a lacklustre control surface such as a rudder, you can power the 6V from the 5V regulator. You’ll need to take the servo input, cut out the 7.2v supply and run up a 5V lead to the servo wire. Not super clear, but it will work.
Right side

Vx is again the assigned voltage, either 5, 6 or 7.2 Volts. This is for servos
Flight controllers that works the Matek PDB FCHUB-W
The F405-STD and F722-STD both have FCHUB connectors which makes hookup fast and simple with this flight controller. If you’re not a big fan of soldering on a flight controller, these two boards are nice alternatives. They have 30.5mm screw holes and thus these are larger footprint light controllers than the 20×20 mini flight controllers.
Matek F405-STD

The F405-STD is my “Goto” flight controller. Pre-Covid I was picking these up for $20 each with a coupon at Banggood. It used to be an inexpensive flight controller. I have this on a lot of planes and this board is a workhorse.
Matek F722-STD

The Matek F722-STD offers a bit faster microcontroller which you may not really notice improved performance over the F405 version. INAV doesn’t exactly tax the CPU. If you look at the reset button the pad next to it says “PWM” whereas the pad next to it on the F405-STD says “S7.” The PWM pad is assignable. Betaflight tends to love to assign pins. I’m not certain how or why you would want to do this in INAV.
The F722 doesn’t need a non-inverted signal out from the receiver, and thus hookup is a bit easier. However, there’s an option in INAV ( in the receiver tab) to reverse the signal. So, this may not be that large of a benefit.
Other than a bit more speed, more flexibility with receivers and the extra PWM pad ,the boards are nearly identical. I am having a hard time justifying the additional price for this board. It’s still a last generation flight controller. Which is fine for now.
Matek F405-OSD
Matek still lists this board as compatible with this FCHUB-W PDB though this board is discontinued. If you happen to have one, it will work with the FCHUB connector.
Overall
Currently the demands of a flight controller from INAV are fairly low. Thus, we’re still using flight controllers from 2018. At some point INAV will move on to harness the abilities of the next generation of flight controllers. We’re still not close to that day. Thus it’s pointless to try and future proof your flight controllers. Buy what works for now, but don’t overspend.
The F405-STD and F722-STD are very good, and have been proven to be worthwhile. Still, Matek didn’t seem to keep going with the FCHUB line of flight controllers. It would have been nice to simply upgrade a flight controller by removing a cable and attaching a new flight controller to a PDB.
This PDB-W was an interesting idea. Unfortunately it’s not a cost effective idea by today’s standards. For what you spend on the flight controller and PDB you’ll have spent more than buying a comparable all in one offering. And yet, if you have an F405-STD or F722-STD left over from a drone, or your other FCHUB PDB died, this is a great solution.
Extra Credit
Let’s say you’re a servo junky, you want pan/tilt, flaps, landing gear, and maybe even a second camera with Pan/Tilt. If you’re going down this route you’ll at least want one of the more modern F722-WPX or F405-WSE for the extra pins and two camera options. Those boards even have ways of turning on and off the power to an action cam so that you can control what you record.

Still, if you like 2.4ghz and you happen to have an FrSky X8R laying around you can split the 8 channels. You will need to make INAV work in the first 8 channels and then you can assign the next 8 channels in OpenTX to channels 9-16 and use the PWM outputs on the RX to control whatever you want to hook up to switches.